

What is SVG?
SVG stands for scalable vector graphics, an open web standard for creating graphics. It uses XML to create two-dimensional vector graphics. It is compatible with other web technologies such as CSS and JavaScript.
Benefits
- Can be created and edited even in a simple text editor
- Can be searched and indexed by search engines( good news for SEO ), scripted, and compressed( Like other image formats ) as it is text-based
- Scalable and Zoomable with no loss of quality
- Can be printed with high quality at any resolution
- Take less space than raster images
Customizable with CSS including animations
- SVG graphics can be animated using JS and CSS. It is, therefore, a powerful format for web developers and animators.
Compatible with almost all browsers
Drawbacks
- Impossible to present complex images and details
- The SVG format is great for 2D graphics like logos and icons but is not ideal for detailed pictures. SVG-based graphics can’t display as many details as standard image formats since they are rendered using points and paths instead of pixels
- Does not support legacy browsers
When to use SVG
- SVG is best suited for logos, icons, interactive graphs, geometric designs, and any other graphics, that use simpler colors and shapes.
- Ideal if you need to display the graphics in multiple sizes, screens, and a variety of devices.
- SVG is great for graphics that need to be updated and edited.
- When you need to create simple animations and interactivity SVG is an ideal format. You can make SVG line animations, transitions, and other complex motions with CSS and JS on SVG graphics.
Tools to create SVG
You can create your SVG graphics from scratch with a text editor. However, it is recommended to use tools when creating complex SVG graphics.
- Adobe Illustrator
- Inkscape
- Vector
- Snap.svg
- Sketch
- Triangle
- Plain Pattern
- Figma
What are SVG elements and attributes?
Just as you use HTML to provide the skeleton for a web page, SVG elements are used to draw a variety of shapes from simple circles to more complex polygons.
When creating an SVG image, the first thing to do is to create a container with tag
For example, to create a circle, you use a circle element wrap in an SVG element
<svg width=“400” height=“400”>
  <circle cx=“100” cy=“100” r=“50” fill=“blue” />
</svg>
As you can be noticed in the above example, SVG elements can be modified with SVG attributes such as width and height. It is critical to know how to manipulate SVG attributes in creating complex SVG. A complete list of SVG attributes and the elements that use a particular element can be found in MDN
SVG interface you can manipulate DOM with SVG DOM API to create SVG with JavaScript. You can make SVG interactive and apply animations with JavaScript by accessing SVG Document Object Model. Here is a list of reference SVG interfaces on MDN.
Creating basic shapes with SVG element
<path> is one of the most complex and powerful elements you can use to create basic SVG shapes. There are two types of commands that the path element takes: line commands and curve commands. Line commands are for creating vertical, horizontal, and diagonal lines, and a simpler to understand. On the other hand, curve commands are somewhat complex, and therefore I would like to focus the next sections on creating curves with curve commands in the path element. There are three types of curves ( curve commands ): quadratic, cubic, and Arc.
Quadratic curve
<svg>
<path
   d="M50 40 Q20 10 10 40"
   stroke="black"
   fill="none"/>
   <path d="M10 40 Q10 60 50 80"
   stroke="black"
   fill="none"/>

   <path
   d="M50 40 Q80 10 90 40"
   stroke="black"
   fill="none"/>

   <path d="M90 40 Q90 60 50 80"
   stroke="black"
   fill="none"/>

</svg>
Cubic curve
<svg>
<path
   d="M 50 40 C30.5 20, 10.5 50.5 ,50 80"
   stroke="black"
   fill="none"/>
    <path
   d="M 50 40 C70.5 20, 90.5 50.5 ,50 80"
   stroke="black"
   fill="none"/>
</svg>
Arc curve
You can also create Arc curves with path elements. Arc is a section of a circle or ellipse. A good understanding of the parameters that the Arc command takes is critical in creating Arc curves.
Parameters
rx( radius x) : horizontal radiusry( radius y)vertical radius- Rotation relative to the x-axis
- Large arc flag
- Sweep flag
- x coordinate of the ending point of the curve
- y coordinate of the ending point of the curve
For example, take a look at the following Arc path
<path d="M40 40 A 1 2 60 0 0 50 80" fill="none" stroke="black" stroke-width="0.2"/>
The curve in the black color is the Arc path. The red dotted lines show how it looks like if you complete the ellipse(remember arc is a section of a circle/ellipse)
M40 40 is the starting point of the Arc curve ( which is common to other curve types as well )
A Stands for the ARC command, which takes the above-mentioned parameters. Let us break down some of the key parameters in the ARC command.
Radius
rx ( radius x) : horizontal radius = 1
ry ( radius y)vertical radius = 2
This means that the vertical radius is 2 times the radius x.
Therefore, the ellipse that this arc belongs to is a vertical ellipse. if rx is greater than ry, it forms a horizontal ellipse, and finally, if rx is equal to ry , it forms a circle.
Rotation (relaive to x-axis) 60 degrees
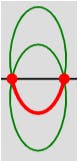
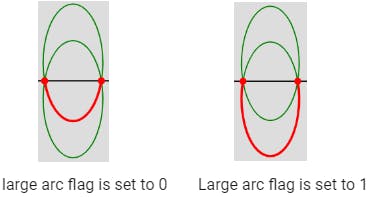
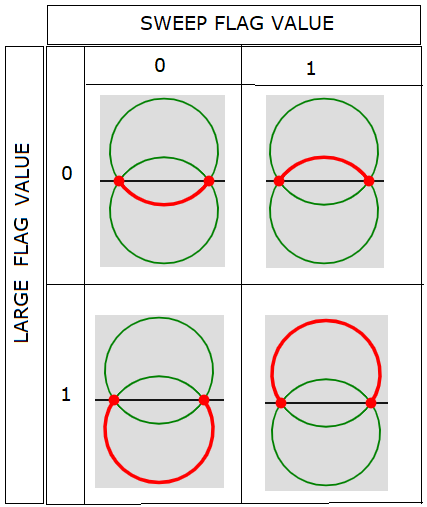
The 4th parameter is what is called the large arc flag. This can take 0 or 1. What is the large arc flag?

Large arc flag
The ellipse's( or circles') radii are minimally expanded if the start and end points of the path are beyond the ellipse's x (rx) and y radius (ry). In other words, if the starting and ending points are sufficient enough to fit rx and ry, there will be one ellipse/ circle and thus one arc curve( the curve in red; actually, there are two possible curves, but we will talk about that later when we talk about the sweep flag)
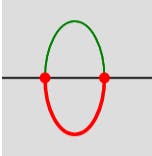
However, if the start and end points are close enough two possible ellipses/circles are created to fulfill the parameters of the arc.
You can experiment with this concept with this tool on codepen.
This concept is critical to understand what the Large arc flag is about. The large arc flag is either 0 or 1. When you set it to 0, it chooses to draw the arc less than 180 degrees(let’s call it a “Small arc”), and when you set it to 1, it chooses the curve greater than 180 ( the Large arc ).
The next parameter is sweep-flag. This flag takes 0 or 1 as values. The sweep-flag flips the arc. When the sweep flag is set to 1, the arc starts in the negative direction and otherwise in the positive direction.
With the combination of large arc flag and sweep flag settings, you can draw a maximum of four arcs( shown in Red in the picture below ).
Last thoughts
An understanding of SVG is an added advantage for web developers. knowledge of HTML elements is certainly helpful in learning SVG as SVG elements are similar to HTML elements and attributes. While there are many tools to create complex SVG, a good knowledge of SVG elements can be helpful in customizing and debugging those complex SVG.