


In this post, I am going to talk about GitHub action attributes, and how to incorporate these attributes in a workflow file. If you are reading this post for the first time, I encourage you to read this post first on an overview of GitHub Actions.
Common Attributes in GitHub Actions
name
You can have a name for your workflow or steps although it is not required. However, it is good practice to have it since it is helpful in debugging.
on
on is a key or attribute that lists events that trigger the workflow. This attribute is required for every workflow file. If there are more than one events that trigger a workflow, you need to specify those events in brackets. You also have more control over triggering workflow with event activity types, filters, and conditionals. I will talk about event activity types and filters in another post later.
single event | on: push |
multiple events | on:[ push, create ] |
Besides repository events, you can also trigger workflows via webhooks or schedules.
jobs
The jobs is an attribute that describes all the jobs running in the Workflow file. A Workflow must have a minimum of one job. Each job must be a unique identifier that must start with a letter/ underscore. They should contain only alphanumeric characters, -, or _.
jobs:
    myjob:
      #whatever myjob does comes here
    anotherjob:
      #whatever anotherjob does comes here
runs-on
specifies the virtual machine ( OS ) that jobs execute on. These virtual machines are called runners. You can specify these runners in YAML format as ubuntu-latest ( or ubuntu-22.04 ), windows-latest ( or windows-2022 ), and macos-latest ( or macos-11 ). A full list of runners can be found on GitHub documentation on runners.
In addition, you can specify self-hosted runners for more control of the hardware, operating system, and software you used in the virtual machines.
steps
Each job consists of one or more steps. A step can be an action and/ or a shell script command. Each step runs sequentially in its own process in the virtual environment. However, you can share data from one step to another. GitHub also provides built-on steps for jobs. Although it is not required, you can specify a name for each step just as you can do it for jobs.
name: Greetings
on: push
jobs:
  my-job:
    name: My Job
    runs-on: ubuntu-latest
    steps:
      - name: Print a greeting
        run:  echo “Hello readers”
How to bundle everything together
Now that we have a basic understanding of attributes, let's see how to create a workflow file from scratch.
We are going to create a Workflow file from scratch. You can use any text editor of your choice. However, I am going to use the web editor on GitHub. One advantage of using this editor is it checks YAML syntax errors on the go.
We are going to do a simple task on ubuntu. We will be creating a directory and creating files inside that directory and displaying the content of the directory.
Adding actions with "uses" attribute
If you have a complex job that needs more than one or two steps. You will need more than one shell script/command for each step to accomplish this task. If you write your own script, you will need more time to write and test your code. This is why it is important to use actions, which are tested blocks of code for complex and frequently repeated tasks.
You can use uses attributes to add actions to steps by specifying the location of the action.
An action can be in 3 locations
Same repository as your workflow file
public repository
Docker container
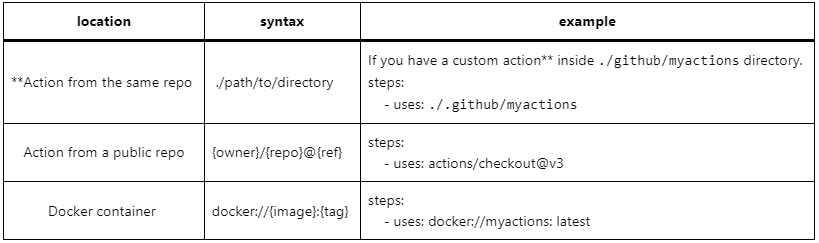
**Note: You can create custom actions and reference those in your workflow file. Creating custom action is beyond the scope of this post. I will be discussing this in a later article.
name: example-action
on: [push]
jobs:
  sampleActions:
    runs-on: ubuntu-latest
    steps:
      - name: checkout
        uses: actions/checkout@v3 #checkout this code to your runner
Job dependencies with "needs" attribute
Jobs, by default, run in parallel. However, you can make jobs run one after another, in case you need, by creating dependencies. The needs attribute is used to create these job dependencies.
Jobs
    Job1:
    Job2:
    Job3:
         needs:[job1,job2]
In this case, job3 will not run until job1 and job2 complete their tasks.
Adding Conditionals with "if"
You can add conditionals in GitHub Action to control the flow of execution. One such conditional is if.
if prevents running a job if the condition specified is not satisfied. The job will be skipped.
name: conditionals
on: [push,create]
jobs:
  printPush:
    if: github.event_name == 'push'
    runs-on: ubuntu-latest
    steps:
      - name: print_push_event
        run: echo "this is push event"
  printCreate:
     if: github.event_name == 'create'
     runs-on: ubuntu-latest
     steps:
      - name: print_create_event
        run: echo "Did you create a branch/tag ?"
In the above example, there are two jobs. The first job runs only on the push event; the second one on creating an event( that is when you create a branch or tag )
You can also add conditionals for the "on" attribute to control the triggering of the workflow file. I will more about such conditionals later when I talk about filters and event activity types.
Conclusion
In this post, you learned the common attributes used in GitHub Actions, creating a workflow file, job dependencies, and controlling the flow of execution with the if condition. If you are reading this post for the first time, I will recommend reading my first post on GitHub Actions. It is an overview of GitHub Actions. In my next articles, I will be discussing artifacts, environment variables, and more conditionals.