How to create WordPress custom taxonomies

Hi, I am Dinesh. I am a Full-Stack Developer and a tech-enthusiast. I believe sharing knowledge and personal experiences is a unique duty of human-being. I am also interested in other aspects such as spirituality, space, health, personal finance, nature, physiology, and human and animal behavior.
check my blog at https://www.tecforfun.com/
Have you ever been in a situation where you can not rely on the default taxonomies WordPress comes with? Have you ever wondered what to do in such a situation? Don't worry in this post I will show you how to organize and group your web content with custom taxonomies.
What is a taxonomy in WordPress?
Taxonomy is a way to organize and group the content in WordPress. WordPress comes with default taxonomies such as categories, Tags, Post format, and Navigation Menus. If you have worked with WordPress, you might well be familiar with Categories and Tags. Those two are used extensively by WordPress users to organize the contents.
There are two broad classifications of taxonomies: hierarchical and non-hierarchical. In hierarchical taxonomies, there is a parent-child relationship between two categories, and in non-hierarchical, there is no such relationship. for example, Categories are hierarchical and tags are non-hierarchical.
The default taxonomies may not be appropriate for the content of your website. In such situations, you can create hierarchical and non-hierarchical custom taxonomies.
How to create custom taxonomies
You can create custom taxonomies using plugins or adding your code. Creating taxonomies with plugins is the easiest way. However. In this post, I will be discussing how you can create a custom taxonomy by code.
You can integrate custom taxonomy in the functions.php file of your theme or you can add the code to create the custom taxonomy as part of a plugin. WordPress recommends adding it as part of a plugin. Therefore, I will create a custom taxonomy in a plugin.
Plugin development is a vast area that can not be covered in one post. In fact, you do not need to know the ins and out of plugin development to create a custom taxonomy. However, I will use the most essential code needed to create a custom taxonomy.
Creating a custom plugin
- Create a folder name course.php in the wp-content/plugins, and add the following code. This is the first step in creating a plugin.
<?php
/**
 * Plugin Name: Course
 * Plugin URI: https://www.yoursite.com
 * Description: This is a simple Course plugin
 * Version: 1.0
 * Author: Dinesh
 * Author URI: https://www.yoursite.com
 */
2. This plugin at the moment does nothing. Our purpose in creating this plugin is to provide a platform to create a custom taxonomy. Add the following code to the course.php file.
function custom_taxonomy_course() {
    $labels = array(
        'name'              => _x( 'Courses', 'taxonomy general name' ),
        'singular_name'     => _x( 'Course', 'taxonomy singular name' ),
        'search_items'      => __( 'Search Courses' ),
        'all_items'         => __( 'All Courses' ),
        'parent_item'       => __( 'Parent Course' ),
        'parent_item_colon' => __( 'Parent Course:' ),
        'edit_item'         => __( 'Edit Course' ),
        'update_item'       => __( 'Update Course' ),
        'add_new_item'      => __( 'Add New Course' ),
        'new_item_name'     => __( 'New Course Name' ),
        'menu_name'         => __( 'Course' ),
    );

    $args   = array(
        'hierarchical'      => true, // make it hierarchical (like categories)
        'labels'            => $labels,
        'show_ui'           => true,
        'show_in_rest'      => true,
        'show_admin_column' => true,
        'query_var'         => true,
        'rewrite'           => [ 'slug' => 'course' ],
    );

register_taxonomy( 'course', [ 'post' ,'page'], $args );
}
add_action( 'init', 'custom_taxonomy_course' );
The main function is the register_taxonomy() ,a WordPress function that takes three parameters.
$taxonomy: this is the name( key ) of your taxonomy.
$object_type: this tells what types of Post types the custom taxonomy affects. In the above code, the "course" taxonomy is associated with the post and page post types. These are, of course, built-in post types of WordPress. In addition, you can create a custom post type and associate the custom taxonomy with it as well. If your custom post type is 'book', you can change the register_taxonomy function as below.
register_taxonomy( 'course', [ 'post' ,'page','book'], $args );
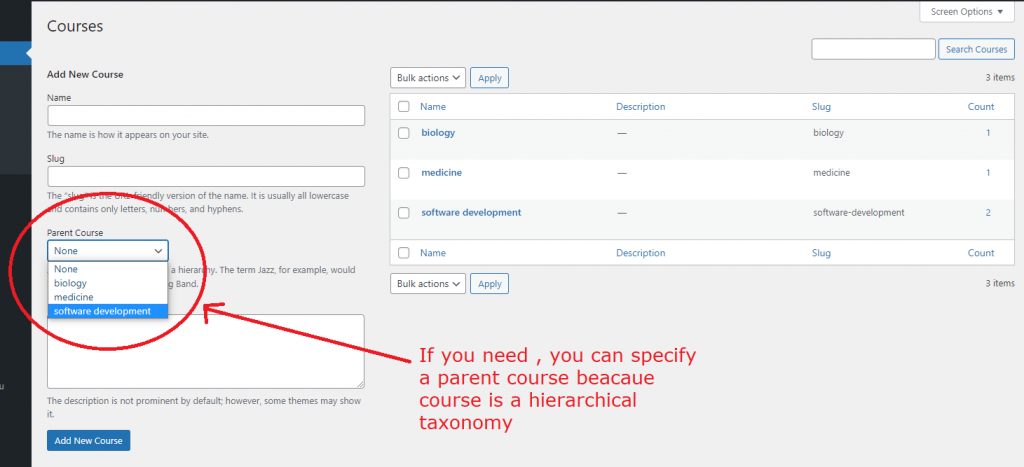
$args: this is an optional parameter. But, I highly recommend having this as it gives you greater control over its appearance. As you can see in the above code the custom taxonomy we are creating is a hierarchical taxonomy. If you want it to make non-hierarchical simply make 'hierarchical' => false.
A complete list of the parameters can be found in the WordPress code reference.
3. Now, we need to add functions to activate and deactivate the plugin
/**
 * Activate the plugin.
 */
function plugin_course_activate() {
    // Trigger our function that registers the custom taxonomy.
    custom_taxonomy_course();
    // Clear the permalinks after the taxonomy has been registered.
    flush_rewrite_rules();
}
register_activation_hook( __FILE__, 'plugin_course_activate' );

function plugin_course_deactivate() {
     // Unregister the post type, so the rules are no longer in memory.
     unregister_taxonomy( 'course' );
    // Clear the permalinks after the taxonomy has been registered.
    flush_rewrite_rules();
}
register_deactivation_hook( __FILE__, 'plugin_course_deactivate' );
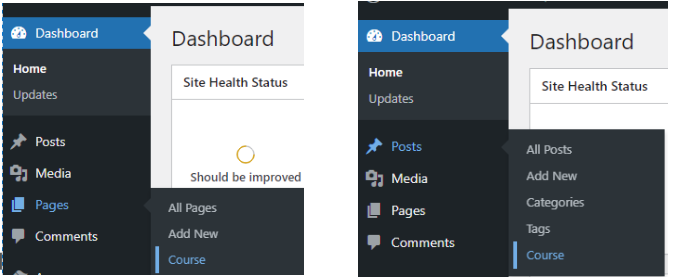
After you add the code for the custom taxonomy and activation and deactivation hooks for the plugin, access the WordPress dashboard, go to plugins and activate the plugin. Then you will see the name “Course” appears on the posts and pages on the main navigation and screen option of the dashboard. It will also show when you try to add or edit posts or pages.
Now, just like categories and tags, you can go to courses and create new courses. For example, I have added 3 courses: software development, medicine, and biology.
Display the taxonomy terms
This section can vary depending on your needs. You can display the taxonomy terms on the home page, archives, single pages, navigation menus, and so on. It is up to the theme developers and designers to decide what areas to show the taxonomy based on user requirements.
I have added the following function to the template-parts/entry-header.php in my child-thems root folder( twentytwenty-child). I used WordPress twentytwenty theme, one of the WordPress default themes.
<?php the_terms( $post->ID, 'course'); ?>

Adding to the navigation menu
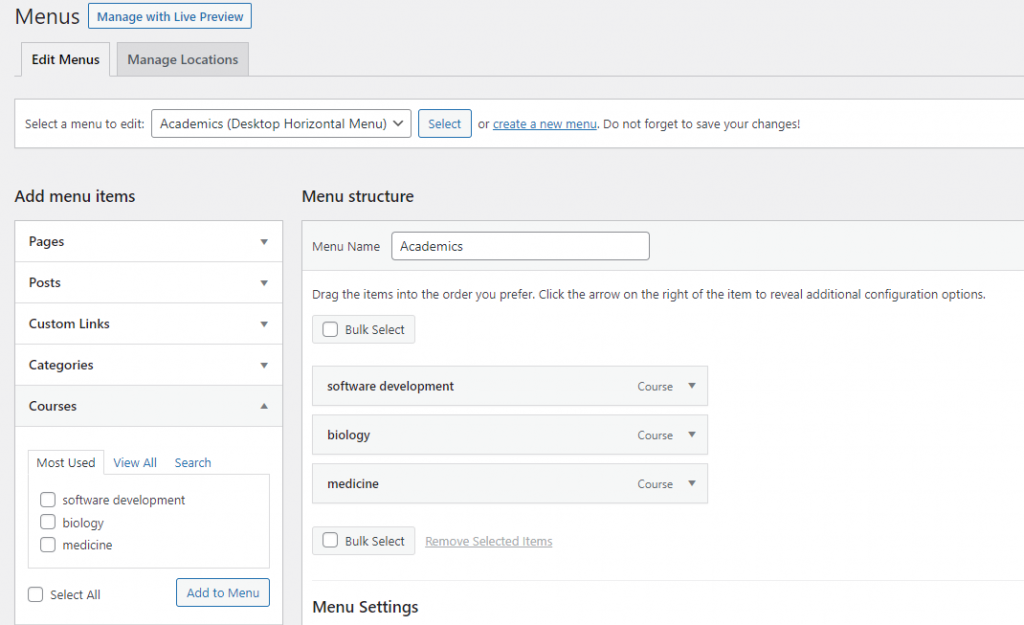
If you want to add the custom taxonomy terms to the navigation menu, you can click on Appearance -> Menus of the WordPress dashboard. Then, give a name for your menu, and add the taxonomy terms from the Course taxonomy. If you do not see the Course taxonomy in the “Add menu items” list, go to the "screen options"( not visible on the image below") and checkmark the "Courses" checkbox. The "screen options" menu appears on the top-right corner of the WordPress dashboard below the Admin bar.
In conclusion
WordPress comes with default taxonomies to organize and categorize the content of your website. Most Wordpress users find these default taxonomies are sufficient for their requirments. However, if you want to go further, you can create custom taxonomies to organize your content.


