Introduction to the WordPress login page
The WordPress login page is a built-in page mainly based on wp-login.php. After you set up your WordPress site, whenever you want to go to the WP dashboard you enter the following URL in the browser.
https://www.example.com/wp-admin or
https://www.example.com/wp-login.php
In any case, WordPress will display its built-in login page.
Basic components of the built-in login page
![image[1].png](https://cdn.hashnode.com/res/hashnode/image/upload/v1649887540243/y63VUEDTW.png?auto=compress,format&format=webp)
- WordPress logo
- Login form
- Login form links
- Login button: user will be redirected to the admin panel
- Lost your password? Link to recover the lost password of a registered user of your site
- Register link: register new users
Please note before you proceed
You need to have a family good understanding of how WordPress dashboard and most importantly you need to know how to create a child theme
Customize the built-in login page with actions and filters
There are different types of actions and filters to customize the built-in page.
The WordPress file wp-login.php is responsible for generating HTML for the login page. You can check out the filters and actions used in wp-login.php here
Let’s look at some of the common customizations you would use.
Changing the logo on the login page
By default, WordPress displays the WordPress logo in the following HTML structure.
<div id=”login”>
<h1><a href="https://wordpress.org/">Powered by WordPress</a></h1>
…….

</div>
You can replace the default logo with your own logo with the following code.
You need to run PHP embedded with some CSS for this. Assuming that you have an images folder in your at the root of your child theme directory.
function my_login_logo() { ?>
    <style type="text/css">
        #login h1 a, .login h1 a {
            background-image: url(<?php echo get_stylesheet_directory_uri(); ?>/images/site-login-logo.png);
            height:65px;
            width:320px;
            background-size: 5em;
            background-repeat: no-repeat;
            padding-bottom: 30px;
            text-indent:0px;
            font-weight:600;
        }
   </style>
<?php }

add_action( 'login_enqueue_scripts', 'my_login_logo' );
Change logo link value
By, default WordPress directs the user to wordpress.org. You can change the link value with the following code so that when the user clicks on the logo then he would redirect to the home page of the site.
function custom_logo_url() {
    return home_url();
}
add_filter( 'logo_headerurl', ‘custom_logo_url' );
If you need the user to stay on the built-in login page if the logo is clicked, you can execute the following code snippet.
admin_ufunction custom_logo_url() {
    return admin_url();
}
add_filter( 'logo_headerurl', ‘custom_logo_url' );
Adding a login header
By default, you will not be able to see a login header text on the login page. If you inspect the CSS of the WordPress logo, you will notice that the text-indent of the anchor tag is set to -9999px ( text-indent: -9999px; ).
Of course, you can change this; make it zero and you will see the header text on top of the logo. Ideally, this may not what you want to see. You may want to add the header text above the logo or under the logo. I will leave it as an exercise for you. But, my approach would be to add an appropriate HTML tag after the anchor tag and style it with CSS.
If you decided, to alter the header text you can use the following code snippet in the functions.php file.
function my_login_header_title() {
     return 'SITE NAME';
}
add_filter( 'login_headertext', 'my_login_header_title' )
Add styles to the login form with CSS
You can style the login form with CSS.
Add your CSS in the separate CSS file and then you can run this file with the help of an Action
For example, I put the CSS code in a file named “style-login.css”. Then execute this code with the following PHP snippet. You need to add the PHP code to the functions.php file.
You can do the same procedure to run scripts. For the purpose of demonstration, I use two lines of Javascripts in a file name “style-login.js” to customize the text in labels on the login form.
To execute styles you need to use wp_enqueue_style WP function , and for the scripts wp_enqueue_script WP function.I called both these built-in functions inside my own my_login_scrpts() function. This function will run with the help of the login_head Action. login_head Action will trigger the login page header after adding the scripts.
function my_login_scrpts() {
  wp_enqueue_style( 'custom-login-label', get_stylesheet_directory_uri() . '/style-login.css' );
  wp_enqueue_script( 'custom-login-label', get_stylesheet_directory_uri() . '/style-login.js' );
}
 add_action( 'login_head', 'my_login_scrpts' );
style-login.css
.login form{
    background-color: #20b2aa;
    color: #00008b;
}
style-login.js
document.querySelector('label[for="user_login"]').innerHTML ="Your Email";
document.querySelector('label[for="user_pass"]').innerHTML ="Your Password";
You can customize all most all the components of the built-in form and the page if you know Javascript, CSS, and WordPress Actions, Filters and Functions.
Develop a custom login page
So far I show you how to change the built-in login page. There can be the time you need a login page with some drastic changes. In such a case, I would rather you a custom login page. We will develop a simple login page at the moment.
You need to have a pre-requisite for this exercise. You need to know how to work with page templates. Creating a page template is simple. Page template is basically a PHP file. WordPress themes have a default page template and all the pages of a WordPress site depend on this page template. However, you can change this. You can create your own page template( custom page template ) and make page/pages inherited from that page template you created.
Step 1: Create a PHP file
Create a file with a .php extension (ex: custom_login_page.php )
Step 2: Make a custom page template
Add the following line in the custom_login_page.php
<?php /* Template Name: custom login Template */ ?>
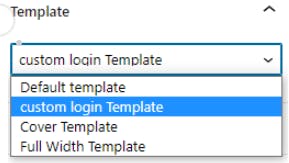
This will make your PHP file a page template. custom login Template is the name of our page template. You will see this name appear when you create and edit pages in the WordPress page editor.
Step 3: Add a login form
Now, add the PHP code to create the login form. In this case, I use the wp_login_form WordPress function to create the form and functionality. This is the easiest way to create a form and its functionality. ( You can also create a form from scratch with HTML and its functionality in Javascript and PHP.)
<?php
if ( ! is_user_logged_in() ) {
    $args = array(
        'redirect' => admin_url(), //redirect to admin panel/dashboard.
        'form_id' => 'custom_loginform',
        'label_username' => __( 'Username:' ),
        'label_password' => __( 'Password:' ),
        'label_remember' => __( 'Remember Me' ),
        'label_log_in' => __( 'Log In custom text' ),
        'remember' => true
    );
    wp_login_form( $args );
}
?>
In our example, we redirect the user to the admin panel. You can change this to any relevant page in your project.
Step 4: Create a page based on the custom page template
Log in to the WordPress dashboard and create a new page. Let’s call it “login”.
We need to edit this page created. Click on edit and this will open the WordPress page editor.
We need to do two things
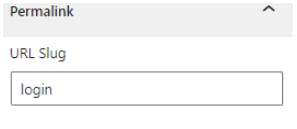
1) Make sure the URL slug of the page is ‘login‘. It should be ‘login’ automatically as the name and title of the page is ‘login’. You can edit this slug as you wish, but you need to use the same slug, later, in the PHP code.

Now, change the Page Template to “custom login Template”

Step 5: Redirect the request to your login page
Now, we need to display this custom login page whenever a user sends a request to wp-login.php,
for example,
http://www.nameofyoursite.com/wp-login.php Or http://localhost/mysite/wp-login.php
You would also use the following URL to log into the admin panel
https://www.nameofyoursite.com/wp-admin or http://localhost/mysite/wp-admin
This request will turn into a query string( I used only localhost as an example )
http://localhost/mysite/wp-login.php?redirect_to=http%3A%2F%2Flocalhost%2Fmysite%2Fwp-admin%2F&reauth=1
The following code snippets will capture both these situations ( URL with the query string and without it) and redirect to the custom login URL and the associated page. Add this to functions.php.
function redirect_login_page() {
  $login_url  = home_url( '/login' );
  $url = basename($_SERVER['REQUEST_URI']); //get requested url
  isset( $_REQUEST['redirect_to'] ) ? ( $url   = "wp-login.php" ): 0;//if users send a wp-admin request in the url

  if( $url  == "wp-login.php" && $_SERVER['REQUEST_METHOD'] == 'GET')  {
        wp_redirect( $login_url );
        exit;
  }
}
 add_action('init','redirect_login_page');
if you did everything correctly, now you will be directed to your custom login page.
Login Error Handling
The custom login page works well if you enter the correct credentials, otherwise, WordPress will push you back to its built-in login page.
Now, let’s see how to change this functionality so that When you enter incorrect credentials you will direct to the login page that you created.
There can be many ways to do this. I will show you how I approach solving this issue.
In functions.php
- Capture the built-in login errors with the login_erros hook.
- Use the login_erros filter hook to redirect to the login page.
- Assign the login errors produced to a PHP session variable to pass it to the login page.
In custom_login_page.php (the custom login page template you created ) - Display the error messages in the session variables
Now, let’s implement this. Add the following code to functions.php.
function error_handler() {
    $login_page  = home_url( '/login' );
    global $errors;
    $err_codes = $errors->get_error_codes(); //get built-in error codes
    $_SESSION["err_codes"] =  $err_codes;
    wp_redirect( $login_page );//keep the user in same page.
    exit;
}
add_filter( 'login_errors', 'error_handler');
Now, Add the following code to the custom_login_page.php.
$err_codes = isset( $_SESSION["err_codes"] )? $_SESSION["err_codes"] : 0;

if( $err_codes !== 0 ){
        echo display_error_message(  $err_codes );
}
The above code checks for any of the error codes in $_SESSION[“err_codes”] Assign it to $err_codes if there are any error codes available. Otherwise, it assigns a zero to $err_codes.
These built-in err codes will pass to the display_error_message function. Below is the display_error_message function in the custom_login_page.php.
function display_error_message( $err_code ){
  // Invalid username.
    if ( in_array( 'invalid_username', $err_code ) ) {
      $error = '<strong>ERROR</strong>: Invalid username.';
  }

  // Incorrect password.
    if ( in_array( 'incorrect_password', $err_code ) ) {
      $error = '<strong>ERROR</strong>: The password you entered is incorrect.';
  }

  // empty username.
  if ( in_array( 'empty_username', $err_code ) ) {
      $error = '<strong>ERROR</strong>: The username field is empty.';
  }

 // empty password.
  if ( in_array( 'empty_password', $err_code ) ) {
      $error = '<strong>ERROR</strong>: The password field is empty.';
  }


 // empty username and empty password.
  if( in_array( 'empty_username', $err_code )  &&  in_array( 'empty_password', $err_code )){
      $error = '<strong>ERROR</strong>: The username and password is empty.';
  }

  return $error;
}
I try to match how WP’s built-in login page displays the error messages. But, of course, you can customize this function according to your needs.
Log out functionality
In this example when you log in with the custom login page you will redirect to the WordPress dashboard.
Then, When you log out, however, it will again direct you to the built-in login page. We are going to change this so that WordPress will direct you to your custom login page.
Add the following code to function.php
function user_logout(){
    $login_page  = home_url( '/login' );
    session_unset();
    session_destroy();
    wp_redirect( $login_page . '?loggedout=true');
    exit;
 }

 add_action( 'wp_logout', 'user_logout' );
You can use the “loggedout” parameter in the custom_login_page.php to inform the user that he is logged out
Add the following code to custom_login_page.php.
$logout  = (isset($_GET['loggedout']) ) ?  "You are now logged out." : '';
echo $logout;
Conclusion
I showed you how to customize the built-in login page with actions and filters. Then, we learned how to go further by creating a custom login page and altering its functionality.
I hope this post is useful for you. Yes, you can improve this code. Your comments are welcome.

