How to use webhook in Next.js On-Demand ISR
Hi, I am Dinesh. I am a Full-Stack Developer and a tech-enthusiast. I believe sharing knowledge and personal experiences is a unique duty of human-being. I am also interested in other aspects such as spirituality, space, health, personal finance, nature, physiology, and human and animal behavior.
check my blog at https://www.tecforfun.com/
What are webhooks?
A webhook is a way for an application to communicate with other external applications. Apps use webhooks to send automated messages or information to other apps. For example, Payal would tell your accounting app whenever a client pays you, Twillio routes phone calls to your number, and WooCommerce can notify you about new orders in Slack. Webhooks have a payload and a unique URL.
The payload carries the data that an app needs to send to the other app. Url tells the to which endpoint the webhook should be sent.
What are the uses of webhooks?
Webhooks are ideal for minor requests and tasks. Many SaaS platforms such as GitHub, Stripe, Shopify, Slack, and Twilio use it for different types of events. For example, you can set up GitHub webhooks for events such as push, branch or tag creation, branch or tag deletion, forking, pull request reviews, etc.
Banking systems often use webhooks to alert their customers of any charges or activities in the account. In this case, the banking service is the source and the email service is the destination. A banking service triggered by an event sends the data associated with the possibility to the email service which uses this data to construct an email for the customer.
E-commerce platforms similarly use webhooks. Imagine you set up webhooks between your E-commerce app and Stripe( the Payment system). If a customer tries to purchase by clicking the Buy button, stripe would ‘speak’ to your app to tell if the checkout is successful or not. In this case, your app is the destination and Stripe is the source.
Webhooks are also important in Workflow automation. Workflow automation software uses webhook to send or retrieve information to external applications.
as you noticed that webhooks are a way of communication among independent systems: E-comm apps talks to payment and shipping, payment to banking, and banking to email. This automatic communication is much more efficient than using API.
How does webhook work?
![image[1].png](https://cdn.hashnode.com/res/hashnode/image/upload/v1665156868531/HA9W0LZUC.png)
In order to understand how webhooks work, we are going to implement one of its applications. Next.js On-demand ISR is one such application that we can use webhook to automate static web page generation in Next.js applications.
For this exercise, we are going to develop a simple Next.js application and connect it with headless cms. Why are we using headless cms in this case?
The application we are going to develop is the destination of the webhook, and the API that interacts with the dataset is the source of the webhook. The headless CMS is responsible for storing and managing the data. We are going to design the structure of the dataset and manage that data with headless cms. We will be using Sanity as the headless CMS.
We will deploy the Next.js application to Vercel. This application ( the destination ) will retrieve data from the headless cms via a webhook upon create, update and delete events in the headless cms (the source).
Creating the Next.js application
- Open the terminal and create a folder/directory named demo-next-sanity-app
- Now, run cd demo-next-sanity-app in the terminal
- Create another folder and name it next. Now change the directory to
next - Inside this folder (
next) runnpx create-next-app .( read asnpx create-next-app dot). This will create a Next.js app inside thenextfolder
Setting up a Sanity project
First, we need to set up the sanity CLI globally.
In your terminal, you can run the following command
npm install -g @sanity/cli
- Create another folder named sanity in the demo-next-sanity-app folder. We will use this sanity folder to set up the Sanity portion of the project. ( now, you should have two folders in
demo-next-sanity-appfolder. One for the Next.js project; the other for the Sanity Project ) - In the terminal run
cd sanityto change the directory. Now, you should be in thesanityfolder - Run
sanity initin the terminal. This is to create a new sanity project in the sanity folder - If you are not logged in, It will ask you to do so. You can use Google, or GitHub, or provide your email and password for authentication.
- After you logged in, close the browser and go back to the terminal. Select
Create new projectfrom the menu that appeared in the terminal. Then, it will prompt you to enter a name for the project. You can enter demo-next-sanity as the name, or any other appropriate name. - Next, you will be asked if you should use
default dataset configuration. For this, enter n (for No ) as we are not going to usedefault dataset configurationfor our dataset. - Then, the terminal will ask you to enter a name for the dataset. You can enter
productdbas the name. - After that, the terminal will prompt you to enter if you should make your dataset private or public. let's keep it private for this project. Now, it will create a new dataset.
- In the next step, the terminal will ask for the Project output path. It automatically read the path of the current folder and shows you in parentheses. You can accept this path by pressing the Enter key.
- The next step is to choose a project template. Select
Clean project with no predefined schemasfor our project. This will create the project structure in the sanity folder.
You can read more on installing CLI and setting up a Sanity project with CLI in their docs.
Creating schemas
After you set up the Sanity project structure, it is time to create schema for the dataset
Open the project in the code editor of your choice. Go to the demo-next-sanity-app\sanity\schemas
Create a file named product.js and add the following schema.
The name and the title of the table/document that holds data in the Sanity dataset is product. One dataset can have more than one document/table. But, we need only one in our dataset.
product.js
export default {
    name:'product',
    title:'product',
    type:'document',
    fields:[{
        name:'id',
        title:'ID',
        type:'slug',
    },
    {
        name:'name',
        title:'Name',
        type:'string',

    }]
}
The above schema is to structure the data of the product. It has two fields namely id and name. The id field is of type Slug. It is important to choose slug here because it helps with uniqueness. In this case, I want to keep id unique, thus slug is a perfect choice. In addition, slug helps with SEO as well.
// First, we must import the schema creator
import createSchema from 'part:@sanity/base/schema-creator'

// Then import schema types from any plugins that might expose them
import schemaTypes from 'all:part:@sanity/base/schema-type'
import product from './product'    //add this line.


// Then we give our schema to the builder and provide the result to Sanity
export default createSchema({
  // We name our schema
  name: 'default',
  // Then proceed to concatenate our document type
  // to the ones provided by any plugins that are installed
  types: schemaTypes.concat([
    /* Your types here! */
    product //This the schema we built. you can more than one schemas sepatared by commas

  ]),
})
The schema.js already has some pre-generated code with comments. This makes it easy to understand what you are doing with your lines of code added.
Now, in the terminal, run sanity start. ( in the terminal, you should be in the sanity directory at this point )
This will start the Sanity Studio in localhost:3333. You need to log in, and you will be redirected to the sanity desk on localhost. You should be able to see the document/table ( product ) created with the schema.
Adding Products to Sanity studio
The following video shows you how to add products so that you know your schema is working as expected. After you add a product, you may close the browser and disconnect from localhost:3333 in the terminal.
Now you can deploy the Sanity project on localhost to the Sanity cloud. In the terminal run,
sanity deploy
you will be asked a name for the host. you can enter demo-next-sanity as the name.
Once you deploy it, you will see the sanity desk online on https://demo-sanity-next.sanity.studio/desk for this project.
Adding environment variables
Now that we set up the dataset on the Sanity Cloud, We need to access those data in the Next.js project. The First step to do in this process is to add environment variables to the development setting so that we can develop the project and test it. We are going to add three environment variables
- project ID
- name of the dataset
- Sanity token
We will use these variables in client configuration later.
Now, you need to create a file named .env.local in the next folder in your project structure. We are going to put all the environment variables for the development settings in this file.
Adding project ID
If you access the following https://www.sanity.io/manage, it will show you all the projects you have on the Sanity cloud.
![image-2[1].png](https://cdn.hashnode.com/res/hashnode/image/upload/v1665157632052/kxkjOmyUp.png)
click on the project you created and you should see the details of the project
![image-4[1].png](https://cdn.hashnode.com/res/hashnode/image/upload/v1665157656534/yw0KtRAf7.png)
copy the project ID and paste it into the .env.local file in your project as below.
SANITY_PROJECT_ID=w6a6mtoq
Adding the name of the dataset
We already know the value of this as we provide this name when creating the dataset. The name we provided was productdb. Enter the following name and value to .env.local.
SANITY_DATASET= productdb
Adding the Access token
We need to generate an API token for secure communication between the Sanity API and the Next.js app. This token will be generated in the Sanity Cloud and added as an environment variable.
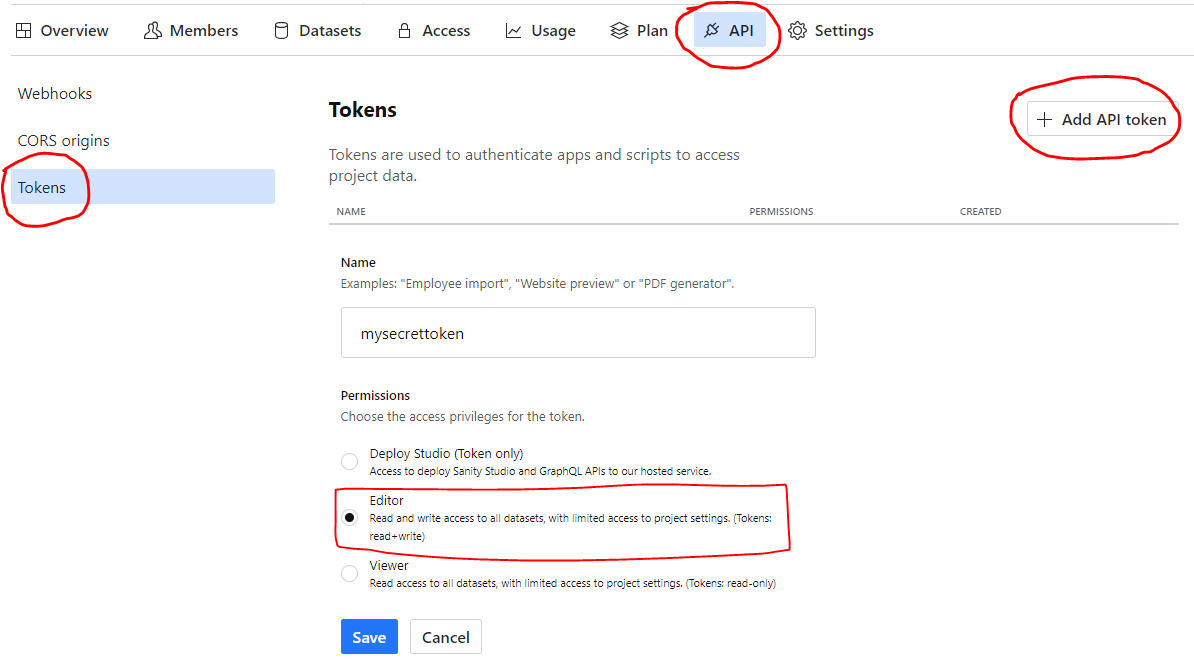
- Click on
APIof your sanity project - Next, click on the
Tokenstab in the sidebar - Then, click on the
Add API tokenbutton - Enter a name for the token (ex:
mysecrettoken) - Make sure to select the
Editorradio button since we need both read and write access to our dataset - Finally, Click on the
Savebutton. It should generate a series of characters, which is the access token. - Copy and paste this token to your .env.local file
SANITY_TOKEN=<<Add your token here>>
Client API CDN configuration
Now it is time to set up client configuration for Sanity in the Next.js portion of the project.
- First, change the directory to the
nextin terminal - Then, install the sanity client
npm i @sanity/client - Create a folder named
utilityin the next folder - Create a file named client.js, and the following lines of code
import client from '@sanity/client'

export const sanityClient = client({
    projectId: process.env.SANITY_PROJECT_ID,
    dataset:process.env.SANITY_DATASET,
    apiVersion:'2022-09-27', // You can use current UTC date
    token: process.env.SANITY_TOKEN,
    useCdn:false, // make it `false` to ensure fetching fresh data
})
As you notice, we have used the environment variable we added to .env.local file.
Adding project files
We have already set up the Sanity part of the project and the client configuration of the Next.js part of the project. Now, we need to create the files that use those data on the Sanity cloud. In this application, we are going to keep things simple. We will create two files. One file displays the index of all products and the other file shows the details of each product selected by the user.
Creating the index.js and [id].js files
- Create a products folder in the pages folder. Then add an index.js file in the products folder
- Add the following code to the index.js file
/next/pages/products/index.js
import Link from 'next/link';
import styles from '../../styles/Home.module.css'
import { sanityClient } from '../../utility/client';

function ProductList( { products }){
    return(
        <div className={ styles.main } >
            <h1>Our Products</h1>
            {
                products.map(
                    product =><div className={ styles.card } key={ product.id }>

                        <Link href= { `products/${product.id.current}`}>
                            <a>{ product.id.current + ". " + product.name }</a>
                        </Link></div>

                 )
            }
        </div>
    )
}

export default ProductList


export async function getStaticProps(){

 const response = await sanityClient.fetch('*[_type=="product" && defined(id.current) && !(_id in path("drafts.**"))]{ id , name } | order( id.current )');


        return {
            props:{
                products: response,
            },

        }
}
5. Now you need to create a dynamic route. Add a [Id].js file in the products folder, and add the following code.
next/pages/products/[id].js
import styles from '../../styles/Home.module.css'
import { sanityClient } from '../../utility/client';

export default function Product( { product }){

    return(
        <div className={ styles.main }>
            {
             <div>
                <p className={ styles.card }>{ product[0].id.current + "." +product[0].name }</p>

             </div>

            }
        </div>
    )
}

export async function getStaticPaths() {

  return {
    paths:[{ params:{ id: '1' }  },],
    fallback: 'blocking',
  }
}


export const getStaticProps = async (context) => {

    const { id } = context.params

    const product = await sanityClient.fetch(`*[_type=="product" && id.current==$id && defined(id.current) && !(_id in path("drafts.**")) ]{ id, name}`, { id })


    return {
      props: { product },
    };
  };
Note: As you notice in index.js and [id].js, I have used some kind of "weird" language in fetching data from the dataset. This language is the Sanity query language GROQ.
On index.js the query fetches all the data in the product documentation and sorts it in ascending order by ID
The whole query in [id].js is checking if the dynamic id matches the "current" property of the id field of the product.
_type== "product" is to select the product document/table
id.current points to the "current" property of id and defined( id.current ) make sure it exists and is not undefined.
_id in path("drafts.**") is to fetch only the published products and no drafts.
{ id, name} are to filter the fields that we need. There are other fields that are automatically generated. But, we filter what we need. { id } stores the value getting from context.params, and $id is a reference to the { id } variable.
In this tutorial, I am NOT focusing on teaching GROQ. But, it is easy to understand if you are familiar with SQL and programming. Once you learn about schema types, documents and drafts, it makes it easier to understand the above query. In the resources section, there is a sub-section where I have provided resources for you to learn GROQ for you to understand these queries in this section.
Now you can run the app in development mode and see if it works. The main thing at this point is to test if the app is fetching data from the dataset in the Sanity Cloud.
If that is successful we are going to deploy the app to Vercel. Before that, we need to add the next folder which we have the Next.js code of the project to the GitHub
Adding the code to GitHub
When you create a next.js project it comes with git initialization. We are going to create a new repository on GitHub, and add push the Next.js project to it so that we can use it for deployment later.
- create a new repo on GitHub. Name your repo as demo-sanity-next-app.
git remote add origin https://github.com/<<your_github_account>>/demo-sanity-next-app.gitgit add .to add all the new files and modificationsgit commit -m "add next.js files"git push origin mainto push your code to the GitHub remote repo
Deploy to Vercel
You can log in to Vercel. You can use your GitHub Credentials to log in to Vercel.
once you logged in, you will be redirected to the Vercel dashboard.
on the dashboard, click on click on Add New... dropdown list, then click on the project.
Then, you can import your repository from your GitHub account
make sure to search for the specific repository that you have created for this project.
We also need to add the environment variables.
Then, click on the Deploy button. This will build your application and host it on Vercel.
Assuming you have given demo-sanity-next-app as the name, you should get a domain name as
https://demo-sanity-next-app.vercel.app
But, remember, the index.js that we created is in the products folder. Therefore, you see the list of the products at https://demo-sanity-next-app.vercel.app/products.
Creating a Webhook in Sanity Cloud
Go back to your Sanity Project on the Sanity Cloud and click on the API tab
Then click on the Webhooks tab, then on the Create webhook button.
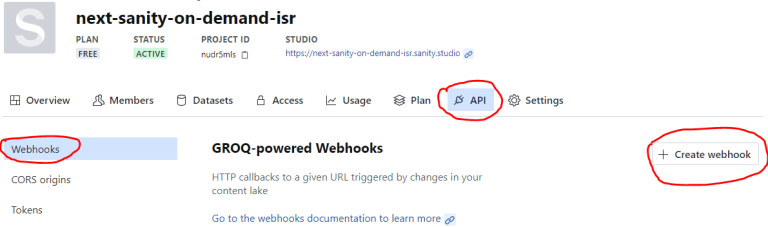
After you click on the Create webhook button, you can enter the following values in the relevant fields
Name: demo-sanity-next (or any name you prefer )
URL: https://demo-sanity-next-app.vercel.app/api/revalidate
Dataset: productdb
Trigger on: select all the triggers:- Create, Update, Delete
Filter: _type=='product'
projection: { "id": id.current } //this is the payload
The filter is to select the table/document we need for the webhook. This is important especially if you have more than one table. The projection is the part that we send in the body. We will use this in the revalidation of a specific page that shows the details of a certain product.
You do not need to change in other settings here. But, make sure on Advanced settings, POST is chosen as the HTTP method used to deliver the webhook.
You can also add a secret can verify the events that Sanity sends to the API endpoint of our app. You can add a String of characters, numbers, and symbols to make the secret more complex in production settings. you need to add this secret to the .env.local for development purposes, and also to Vercel in deployment settings as an environmental variable.
.env.local
SANITY_WEBHOOK_SECRET=myWe3H0ok$ecret
On the Vercel dashboard, you can go to settings on your project, click on Environment variable tab, and add the name( SANITY_WEBHOOK_SECRET ) and value ( myWe3H0ok$ecret ) of the webhook secret.
You can learn more about adding Webhook in Sanity in their official documentation.
Adding revalidation API
We need to create the revalidation API in the pages/api folder in the application. As you know Next.js is a full-stack React framework. We have already created the index.js and [id].js files that represent the front-end side of the app. The API that we are going to create is the backend side of the project. Setting up datasets on the sanity cloud can also be considered as the backend of this application.
This revalidation API is what makes On-Demand ISR different from traditional ISR in which revalidation is set up to happen in a specific time period. But, in On-Demand ISR, as the name suggests, revalidation to create static pages happened on request. This request can be automated. In this application, we will automate this using the webhook we created. We use events( create, update, delete ) associated with the dataset in the Sanity cloud to trigger the webhook.
First, we need to add a new library to deal with incoming webhook
in the terminal, change the directory to next, if you are not in it, and run the command below
npm i @sanity/webhook
Add a new file called revalidate.js in pages/api. This file matches the revalidate part of the URL ( https://demo-sanity-next-app.vercel.app/api/revalidate ) that we entered in webhook settings on the Sanity cloud.
pages/api/revalidate.js
import { SIGNATURE_HEADER_NAME, isValidSignature } from '@sanity/webhook';

const handler = async (req, res) => {

//authenticating the webhook
  try {
    const signature = req.headers[SIGNATURE_HEADER_NAME].toString();
    if (
      !isValidSignature(
        JSON.stringify(req.body),
        signature,
        process.env.SANITY_WEBHOOK_SECRET
      )
    )
      return res.status(401).json({ msg: 'Invalid request!' });

    //getting payload
    const { id } = req.body;
    await res.revalidate(`/products/`);
    await res.revalidate(`/products/${id}`);

    res.status(200).json({ msg: 'Product pages revalidated.' });
  } catch (error) {
    res.status(500).json({ err: 'Something went Wrong!' });
  }
};

export default handler;
in the above code, the most important lines for us is
  await res.revalidate(`/products/`);
  await res.revalidate(`/products/${id}`)
The first one is to revalidate the index page, while the second one is for the specific product page(detail page).
After you debug any errors you make, make sure to add, commit and push the code to GitHub. This will automatically deploy the new code on Vercel. You do not need to redeploy it manually.
Testing the app
Now you can make changes in the data dataset in Sanity studio, and refresh the following routes. If you follow this tutorial successfully, you should see the changes appear on the pages. Sometimes it might take some time to update the changes depending on the network speed, but definitely, the changes you make should appear without having to redeploy the entire app.
https://demo-sanity-next-app.vercel.app/product ( the index page )
https://demo-sanity-next-app.vercel.app/product/1 ( for product 1, for example)
Resources
What are Webhooks? Easy Explanation & Tutorial
Webhook vs. API: How Do They Compare?
Resources to learn Sanity and GROQ
Create a schema and configure Sanity Studio
Content modeling in Sanity Studio
GROQ function reference: defined & path
GROQ-pipeline-components: order


